> For the complete documentation index, see [llms.txt](https://docs.onto.app/llms.txt). Markdown versions of documentation pages are available by appending `.md` to page URLs; this page is available as [Markdown](https://docs.onto.app/guides/discover/ontology/wing-inclusive-pool-user-guide.md).
# Wing Inclusive Pool User Guide
*This tutorial is applicable to ONTO users to participate in credit-based supplying, borrowing, and insuring in Inclusive Pool to obtain WING incentives. Users need ONTO updated to v3.6.4 or above.*
*Reminder: authorization, chain-crossing, supplying, withdrawal, borrowing, repayment, insurance, surrender, transfer, and other operations all require handling charges. Please prepare in advance to avoid transaction failure.*
*For the time being, the Inclusive Pool only supports supplying, borrowing, and insuring of pDAI, pUSDT, and pUSDC.*
***How to quickly get ONG to pay for handling charges on the Ontology blockchain?\****
> *On the “Assets” page, click ONT to enter the ONT details page, click the fast exchange icon in the upper right corner, input the ONT exchange quantity (up to 10 ONT per day) in the pop-up window, click the “Swap Now” button, and enter the password to complete the fast exchange.*
## 1. Generate Your OScore
The OScore is a user self-management scoring system supported by ONTO which integrates all kinds of data from the blockchain. An OScore reflects the level of assets owned by users.
The OScore score of users participating in the Inclusive Pool can affect the credit limit of users. This guide will help you get your OScore!
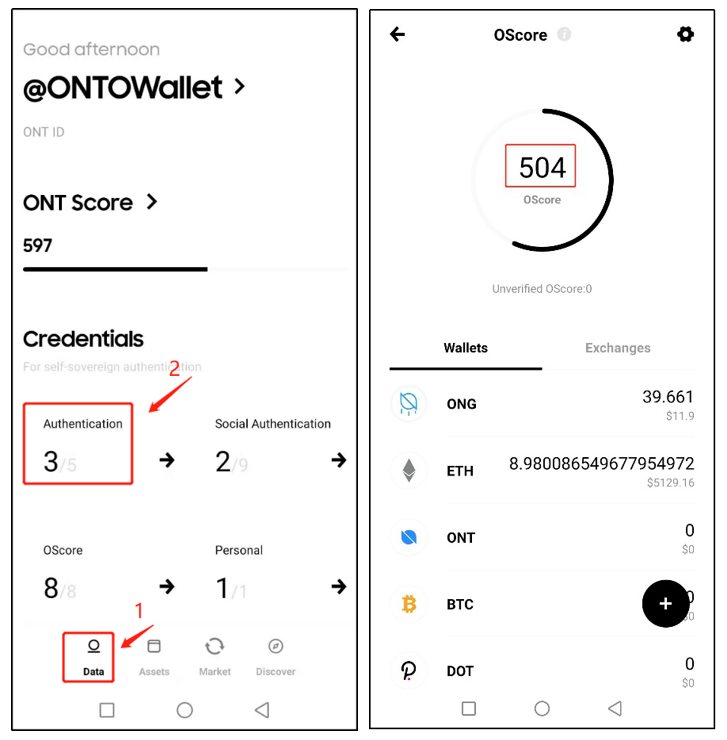
Open your ONTO wallet, click “OScore” in the lower-left corner of the “Data” page to enter the OScore page. The wallet will automatically calculate the on-chain asset value of all addresses under the current ONT ID before generating your OScore score.
*You can press the “+” button to add assets under other addresses, but at present, it is not helpful to increase the borrowing limit of Wing. Subsequent versions will support this function.*
*Users who only participate in Supply/ Insure aspect of the Inclusive Pool can skip this step.*
## 2. Make assets cross-chain operable
Assets on the Ethereum chain need to be converted into pTokens across the chain before users can use them to participate in the supplying, borrowing and insuring of the Inclusive Pool.
**Step 1: Approve (required for the first time cross-chain activities)**
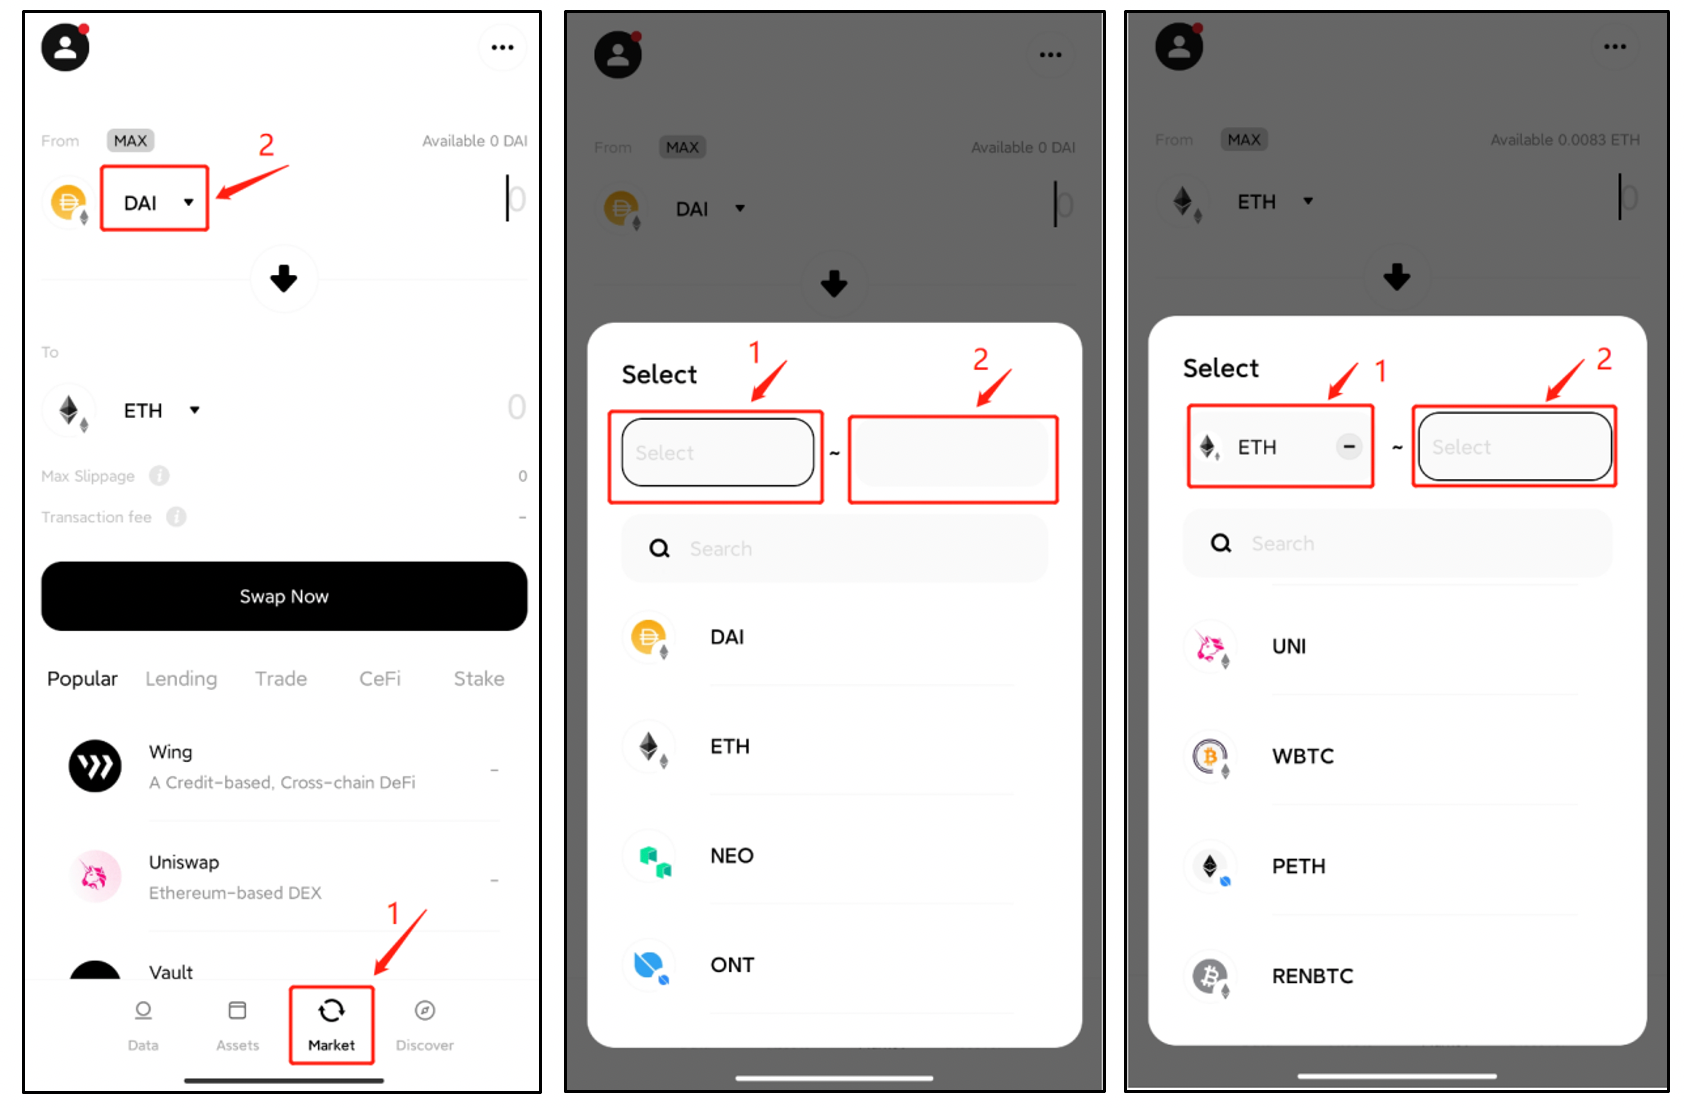
Open ONTO, click “Market” in the bottom sidebar to enter the Market page, and select the asset type you want to exchange. Take converting ETH to pETH as an example (see pictures). Click the asset icon below “From”, and select ETH and pETH in the pop-up window.
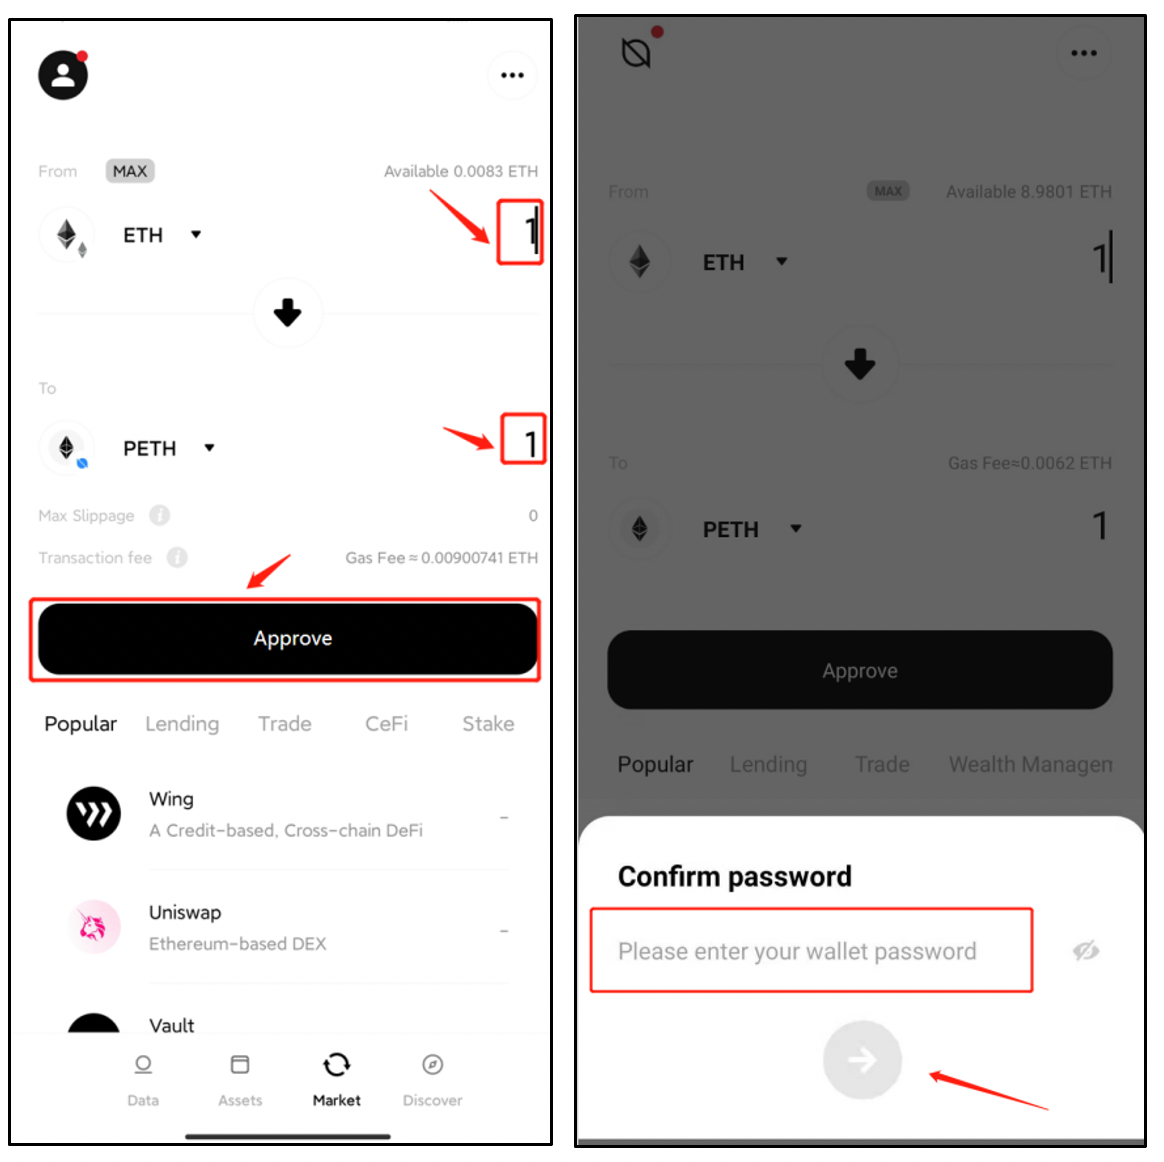
You need to “Approve” to exchange currencies on the Ethereum chain for the first time. Input the number of ETH you want to exchange in the input box, click the “Approve” button below, enter the wallet password in the pop-up window, and click the arrow below to confirm. The authorization will be successful after the approval is completed.
**Step 2: Swap**
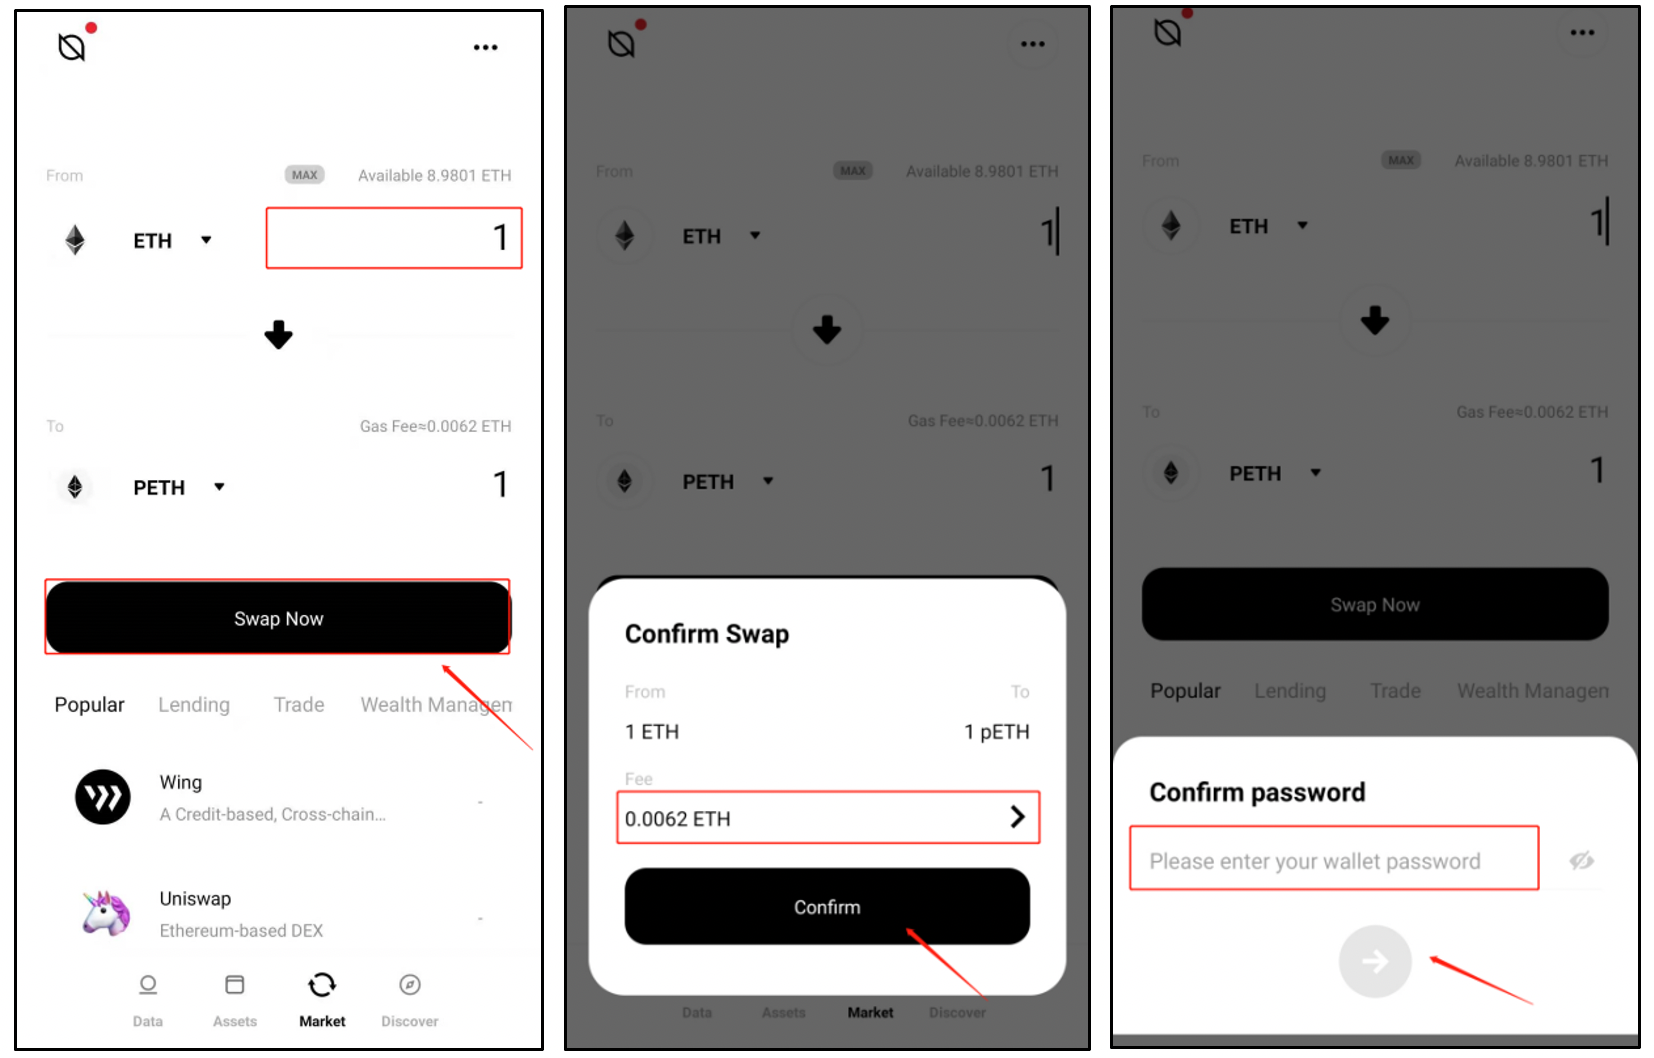
After the authorization is successful, enter the quantity of ETH to be exchanged on the market page, then the quantity of the pETH converted and the service charge to be consumed will be displayed automatically. ETH is used to pay service fees required to cross chains from the Ethereum chain to the Ontology chain. Click the “Swap Now” button below, confirm the exchange information again in the pop-up window, click the “Confirm” button, then input the wallet password in the pop-up window and click the arrow below to confirm. You can check the converted asset on the Asset page after the process is completed.
Reversing the cross-chain process only requires exchanging asset types between From and To. The asset type used to pay service charges is pToken for crossing chains.
*Enter the transaction Hash at* [*https://explorer.poly.network/*](https://explorer.poly.network/) *to check the cross-chain progress.*
**Step 3: Check pToken assets**
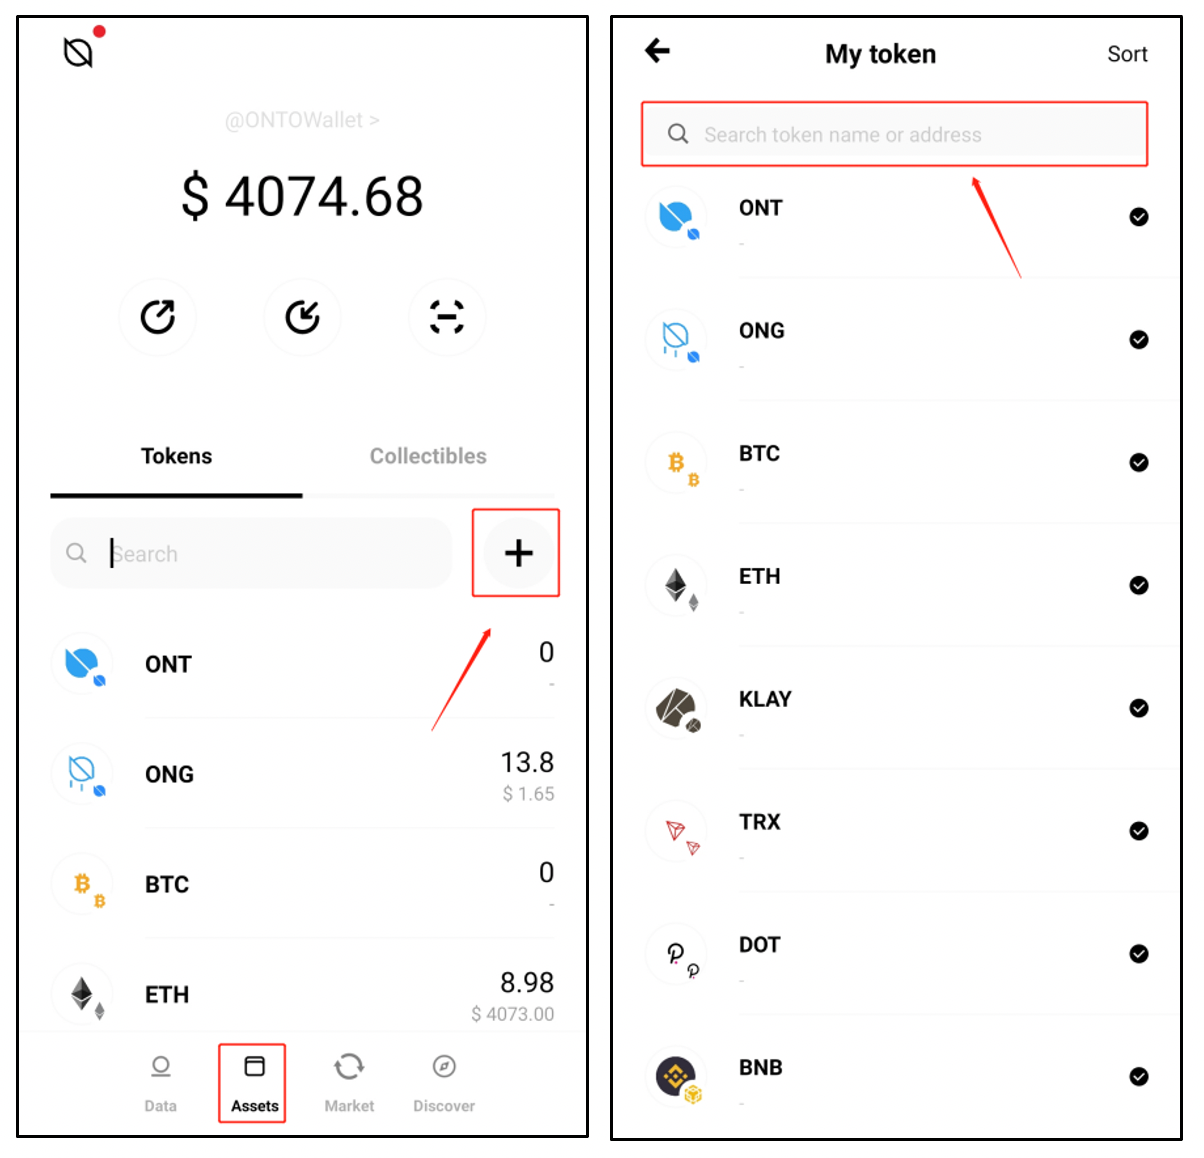
Click “Assets” in the bottom sidebar to enter the asset page, click “+” to enter the currency management page, and click the search box above.
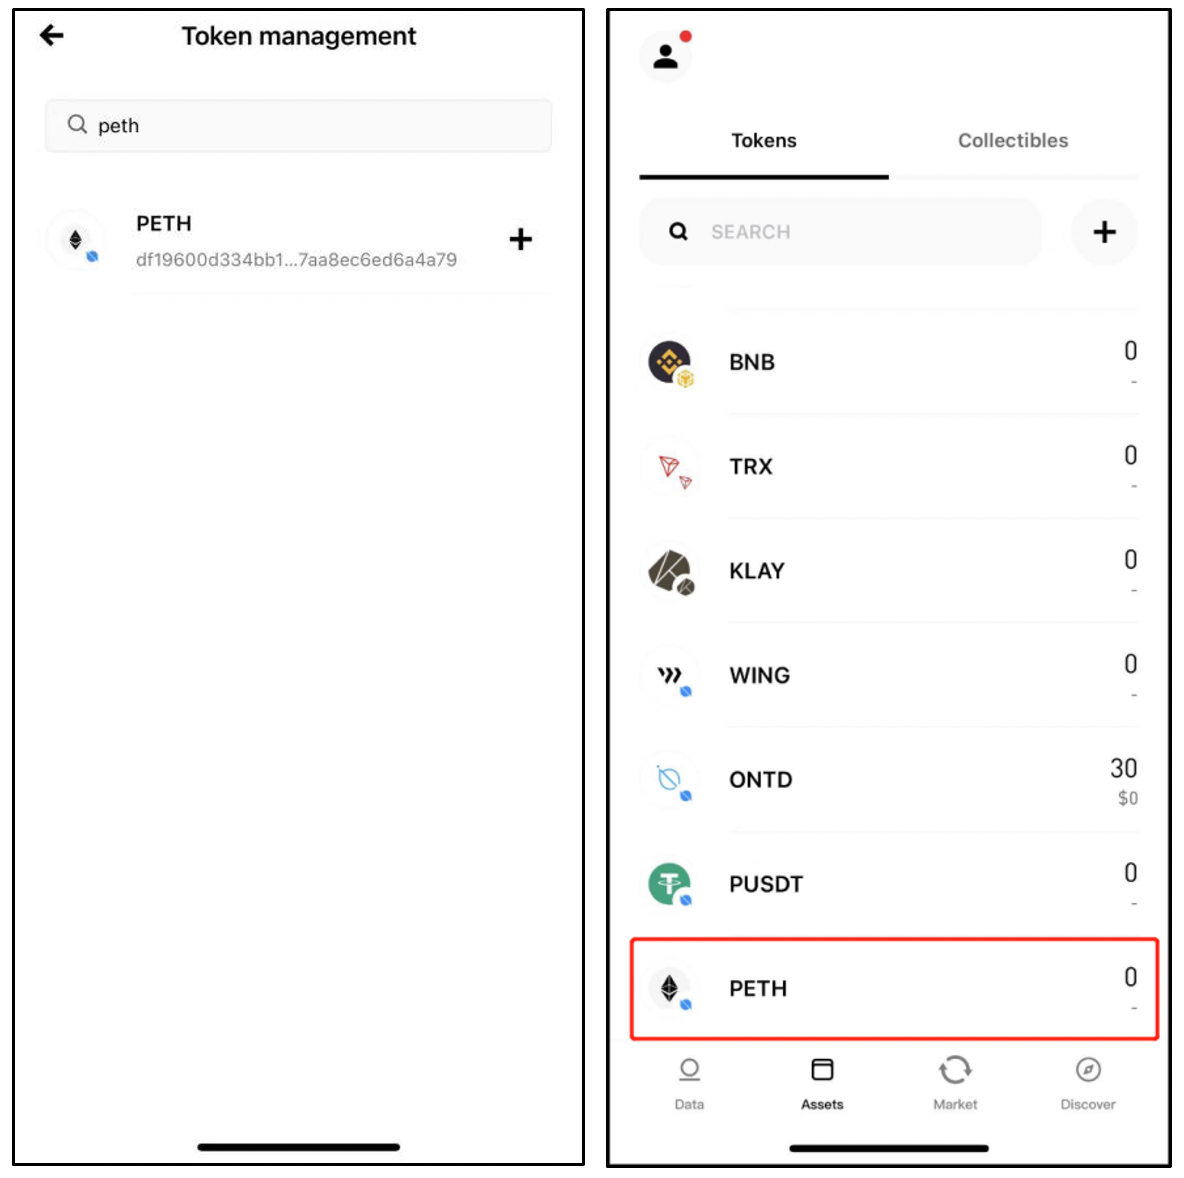
Enter the currency name or currency Hash you want to add in the search box, click “+” on the right side of the currency to complete the addition. You can then go back to the asset page and view it. The balance of the pToken account is on the right side of the line where pToken is located.
*You can check asset types of Hash that can be used at Wing on the* [*Docs*](https://docs.wing.finance/) *page of Wing’s official website.*
## 3. Borrow from the Inclusive Pool
Borrow refers to borrowing assets and repayment before the due date. Through the process, WING incentives can be obtained, but interest needs to be paid. Interest paid via the same asset type of the loan is shown as APR while the obtained incentives are WING, shown as WING APY. Each operation requires ONG for service fees.
The credit limit of a single user is 20–1,000 USDT. Users can borrow again after repayment. Assets can be borrowed at most once every 24 hours starting at 00:00 UTC. The value of the borrowed assets can not exceed the maximum borrowing amount. The term is 7 days (UTC time) and the loan can be repaid in advance. If repayment is overdue for more than 1 day after the grace period (UTC time), the assets will be liquidated. The defaulting user will then be listed in OScore’s private-protected default list, which will affect subsequent asset borrowing. Please repay the borrowed assets before the due date after fully understanding the borrowing rules.
### 3.1 Collateral and Borrowing Assets
**Step 1: KYC certification**
Since the Inclusive Pool is a non-sufficient lending pool based on credit factors, KYC authentication is required to obtain a borrowing authority for participating in borrowing. The specific operation is as follows:

Open ONTO wallet, click “Authentication” on the Data page, and select Shufti Pro from the authentication list.
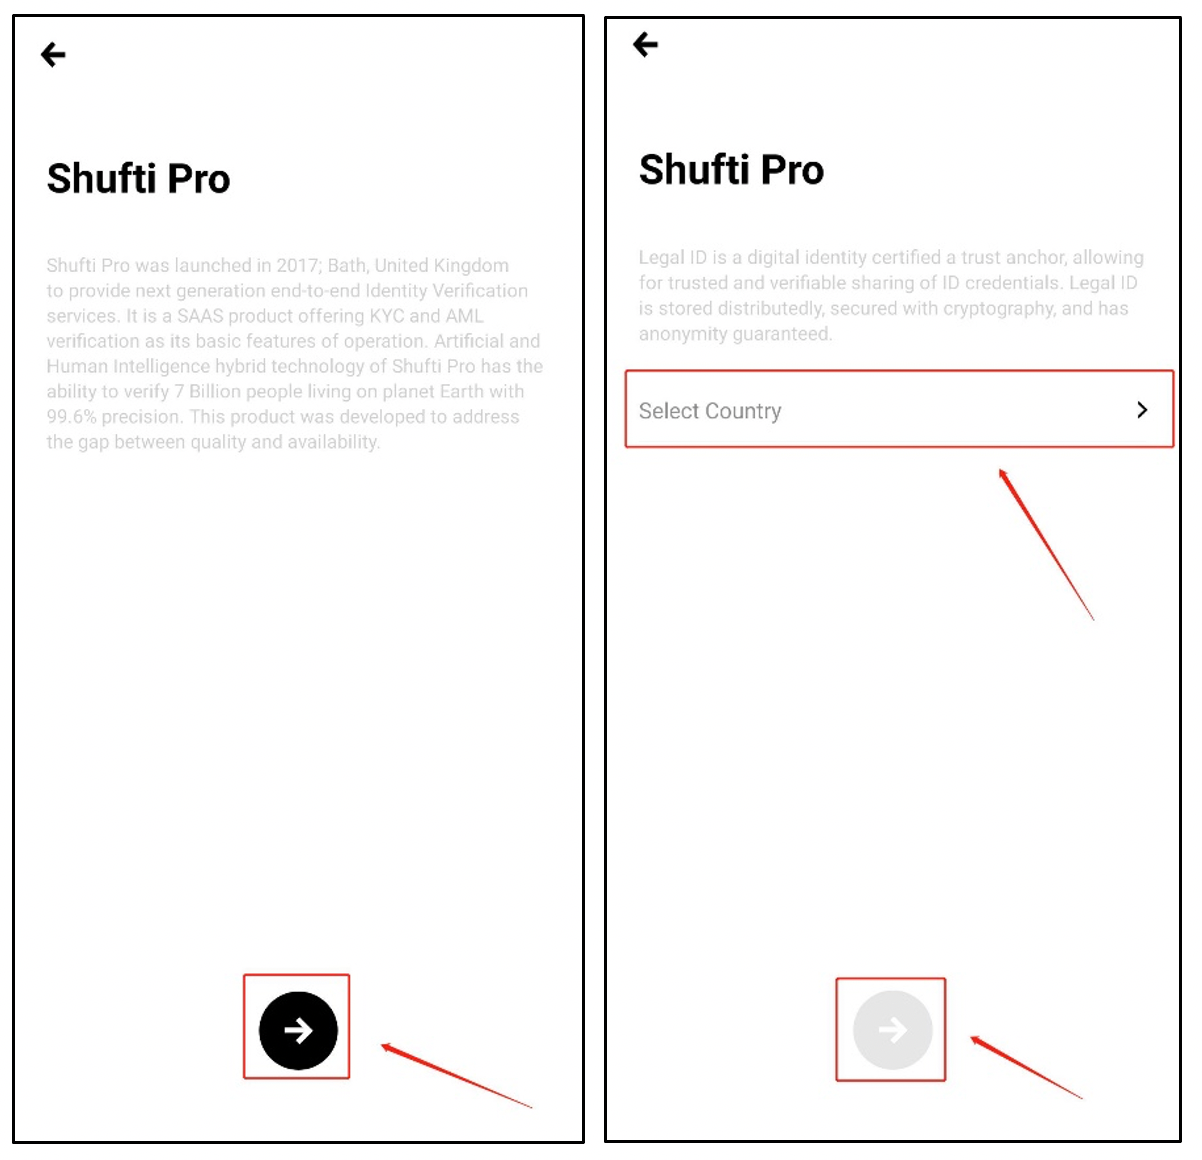
Enter the Shufti Pro introduction page, click the arrow below, select the nationality in the selection box, and then click the arrow below.
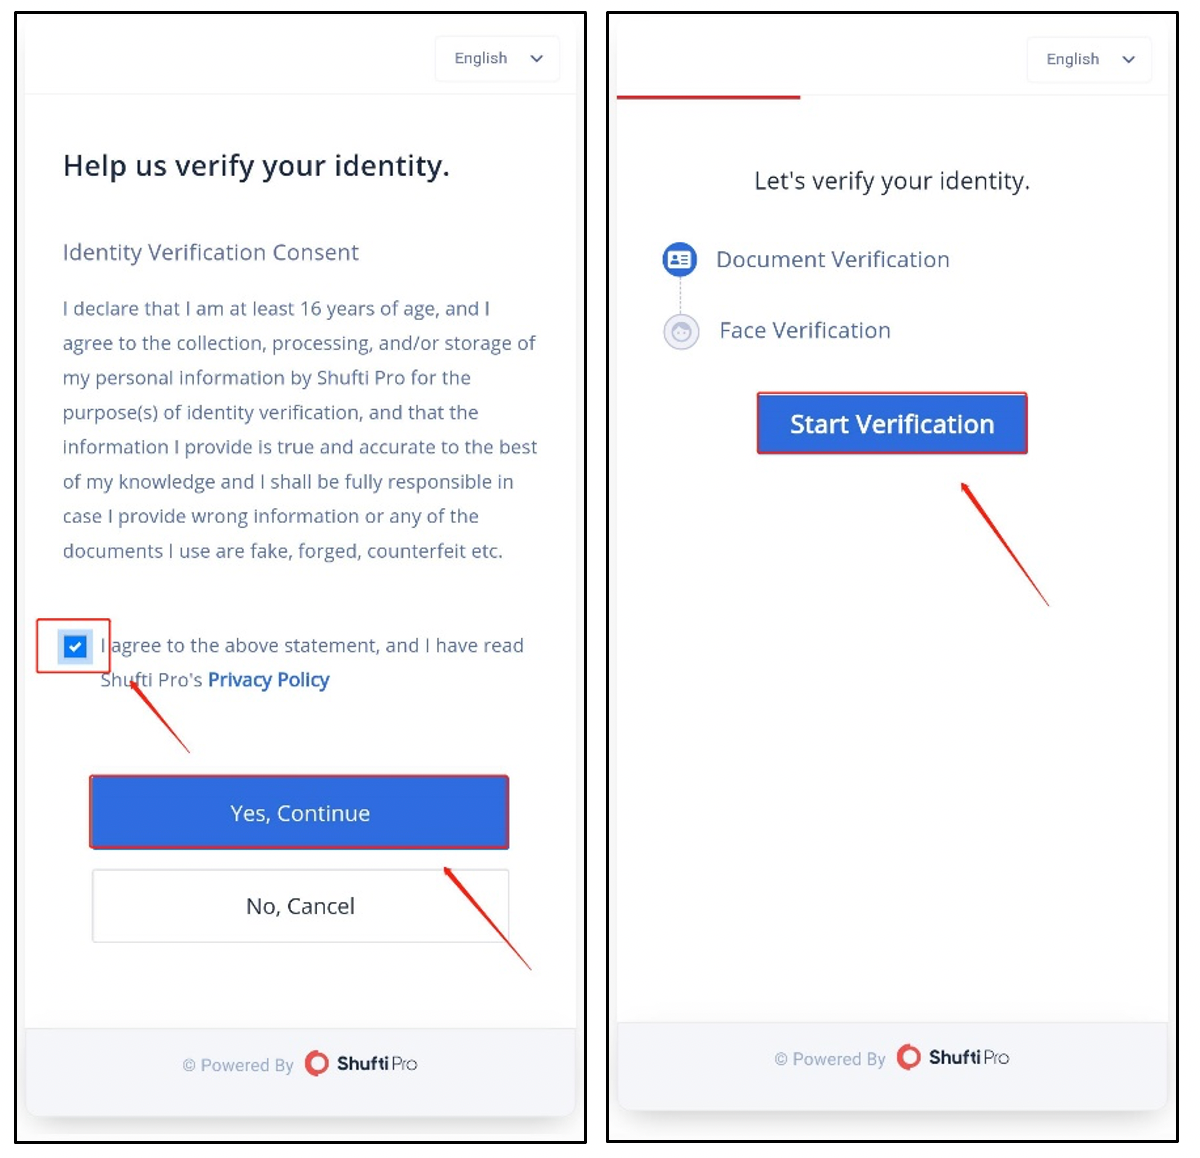
Check the option to agree to the authentication statement, click the blue button to continue, and click “Start Verification” on the new page to start verification.
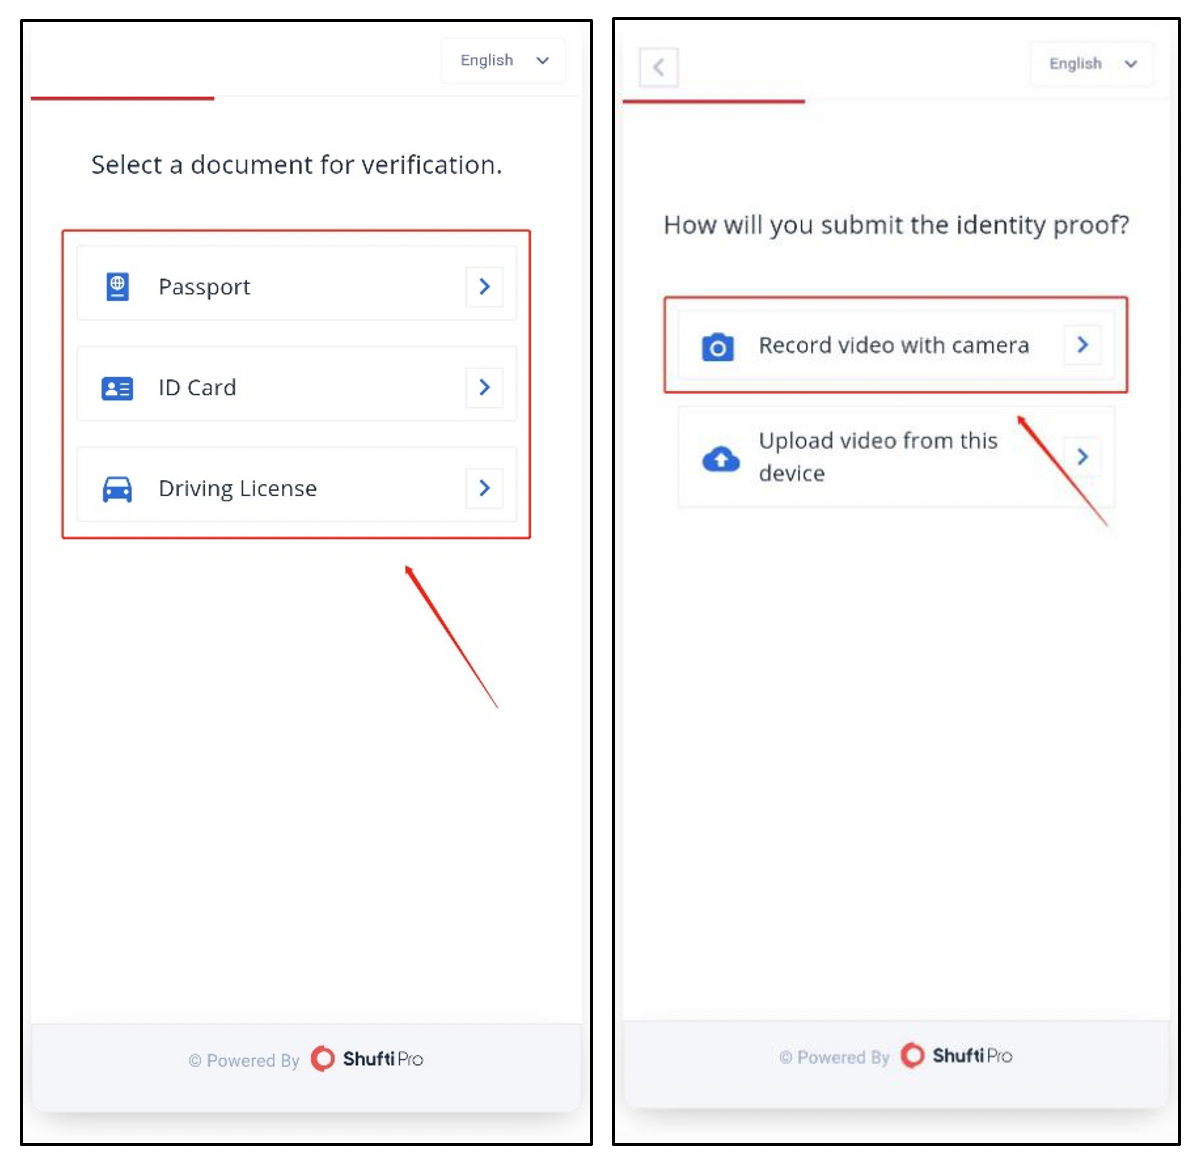
Shufti Pro supports authentication with a passport, ID card, and driver’s license. Here, take the ID card as an example. Click “ID card” and select “Record video with camera” on the next page.

After reading the instructions of Shufti Pro for shooting authentication videos, click “Continue”, and “Yes” after preparing for the certification and shooting environment.
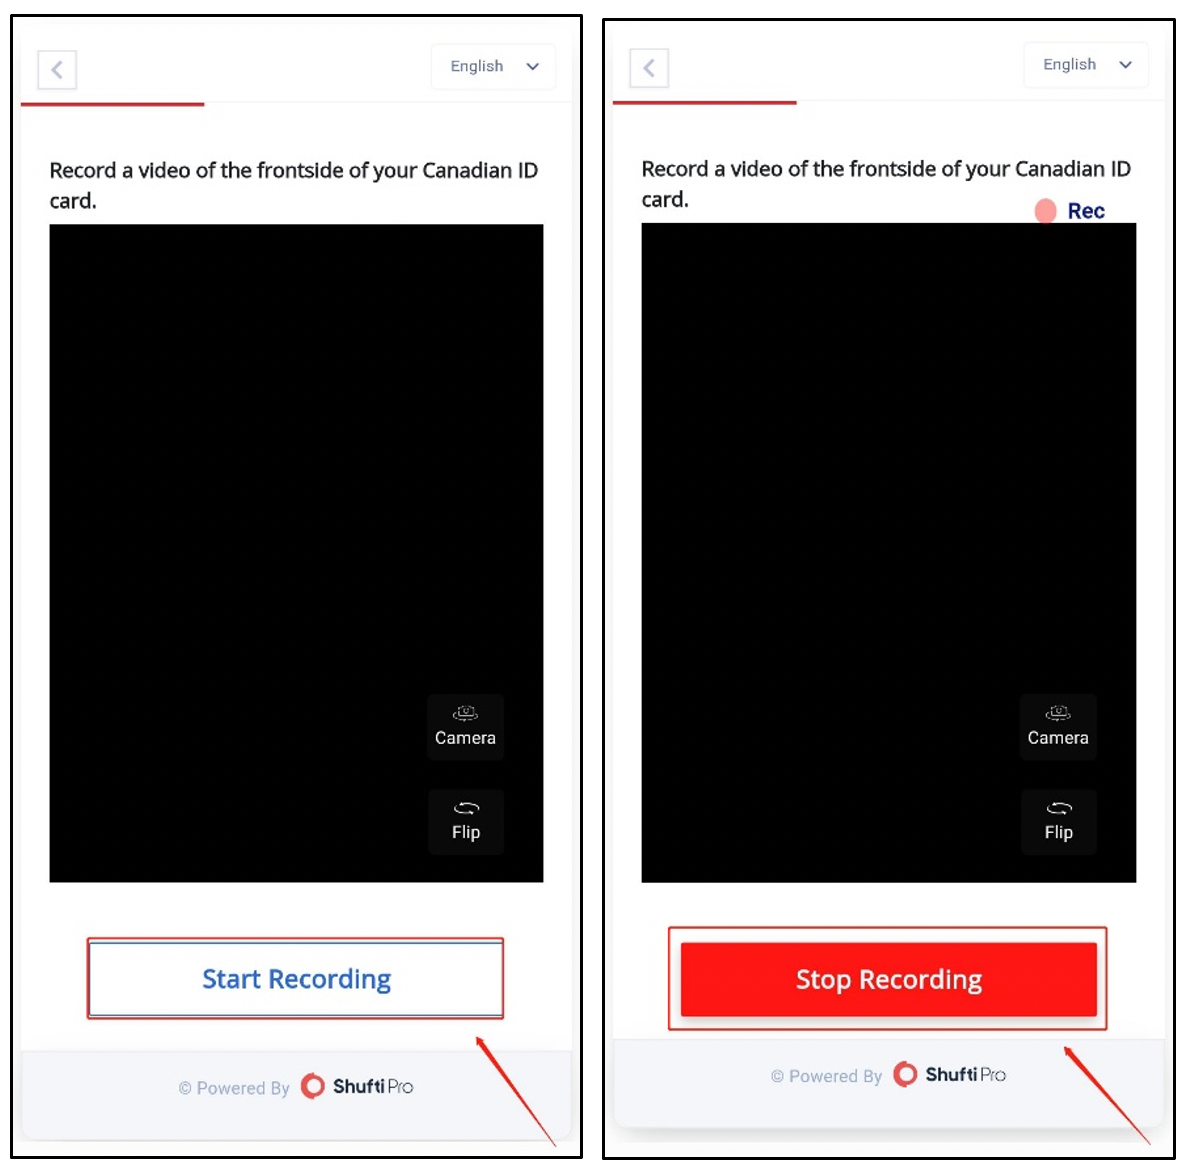
Adjust the camera angle, click “Start Recording” to start shooting. During shooting, please adjust the focal length to ensure that the document text in the video is clear. After shooting, click “Stop Recording” to stop shooting.
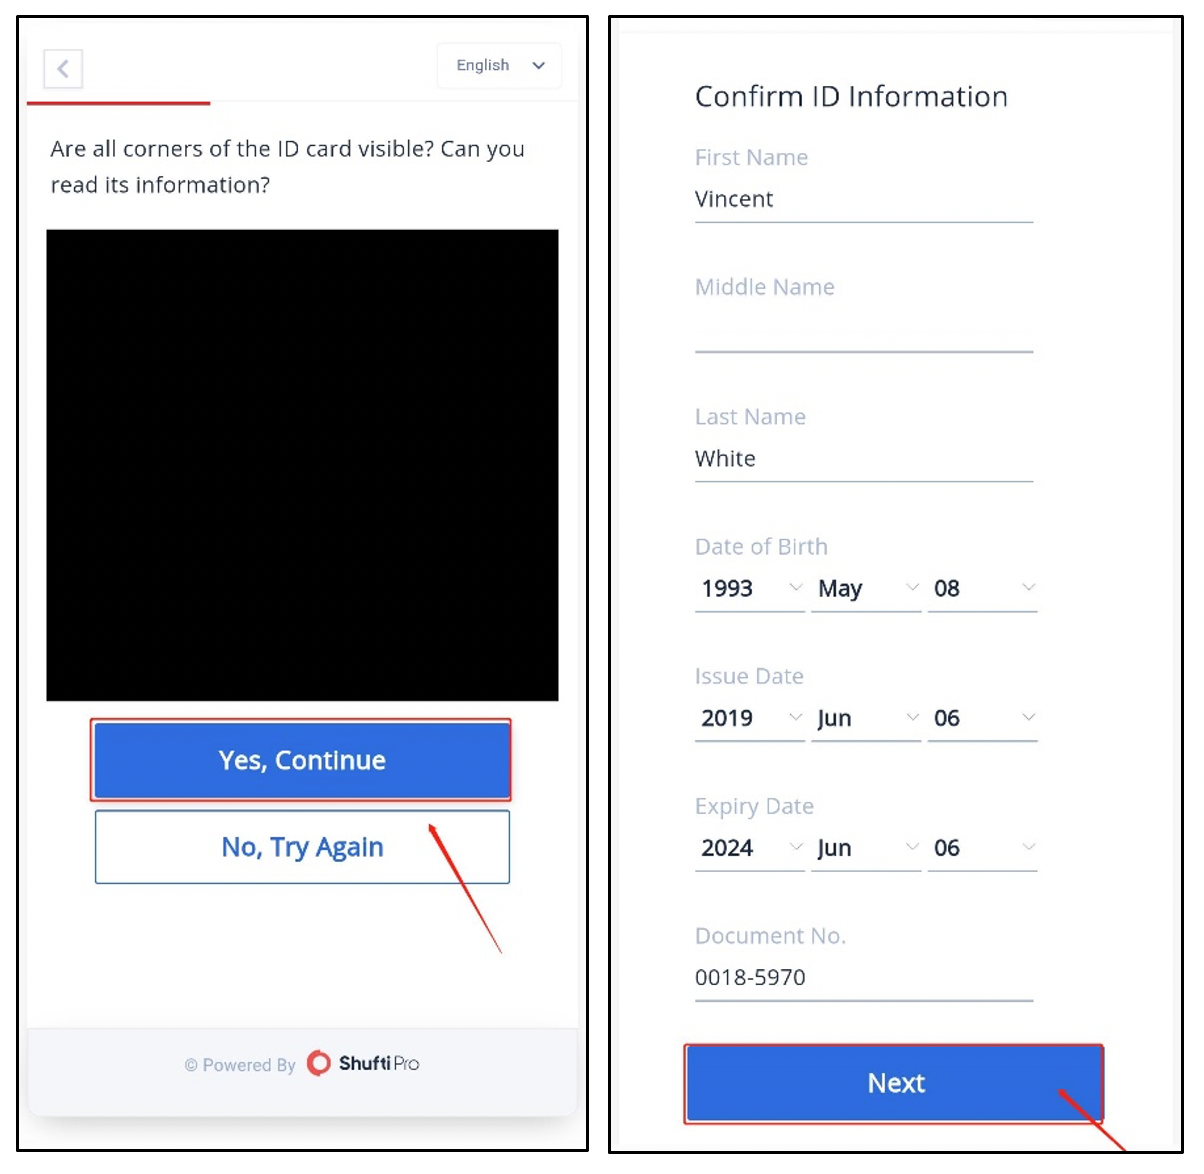
After shooting, check whether all the contents of the ID card in the video screenshot are clear and visible. After confirmation, click “Yes, Continue”. If you are not satisfied with the shooting, you can click “No, Try Again”. Check whether the automatically identified certificate information is complete and correct on the confirmation information page, and click “Next” after completing and correcting the necessary information.

After the certificate authentication is successful, you need to enter the facial authentication process. Click “Start Verification” to start authenticating, and select “Record video with camera”.
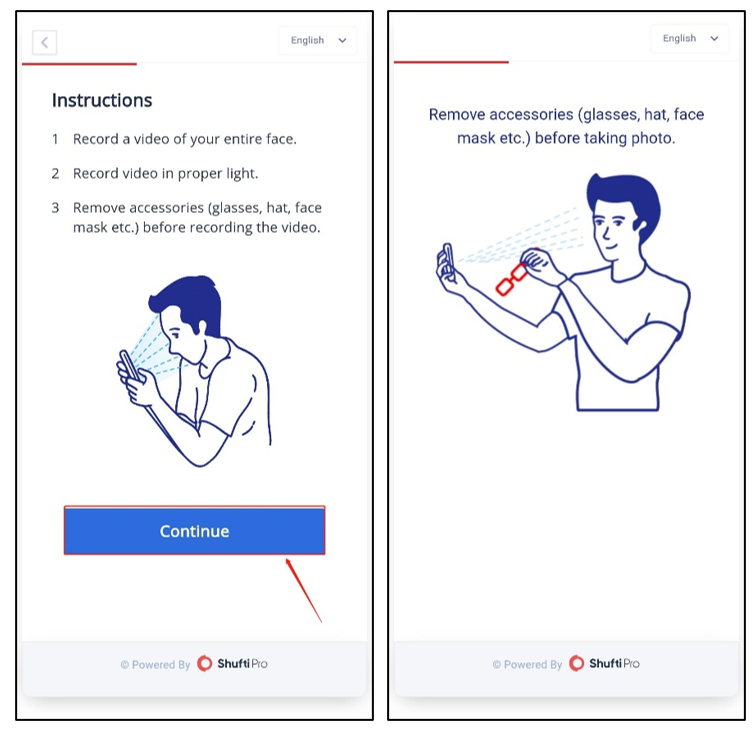
Read the facial authentication instructions. Please record videos in the proper light and remove glasses to ensure your entire face is recorded. Click “Continue”.
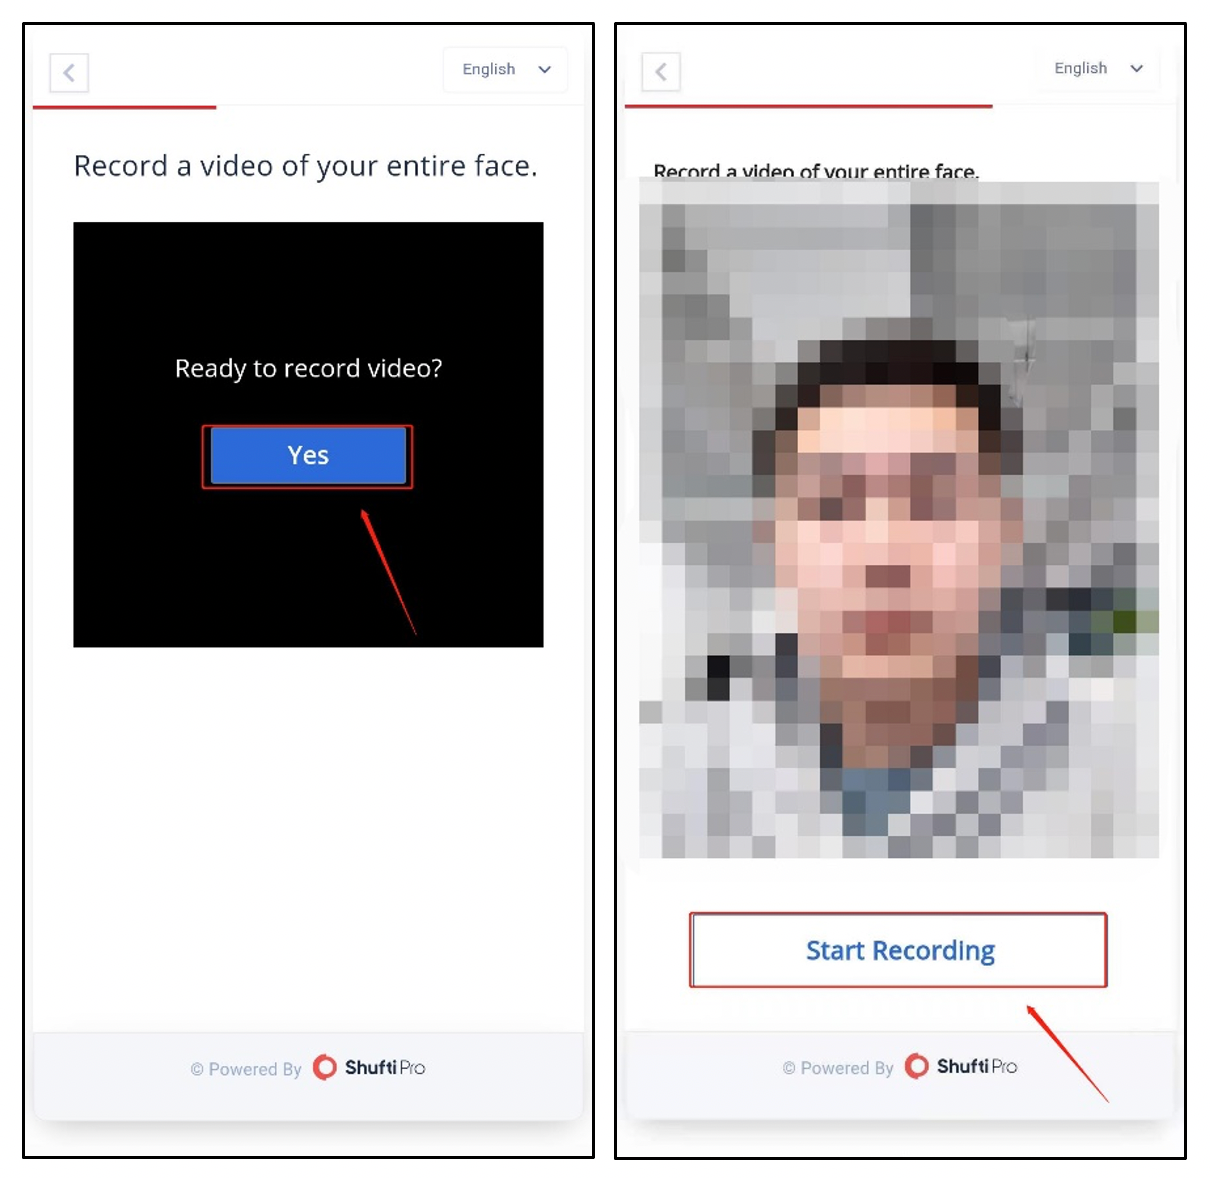
Click “Yes” to turn on the camera, and click “Start Recording” to start.
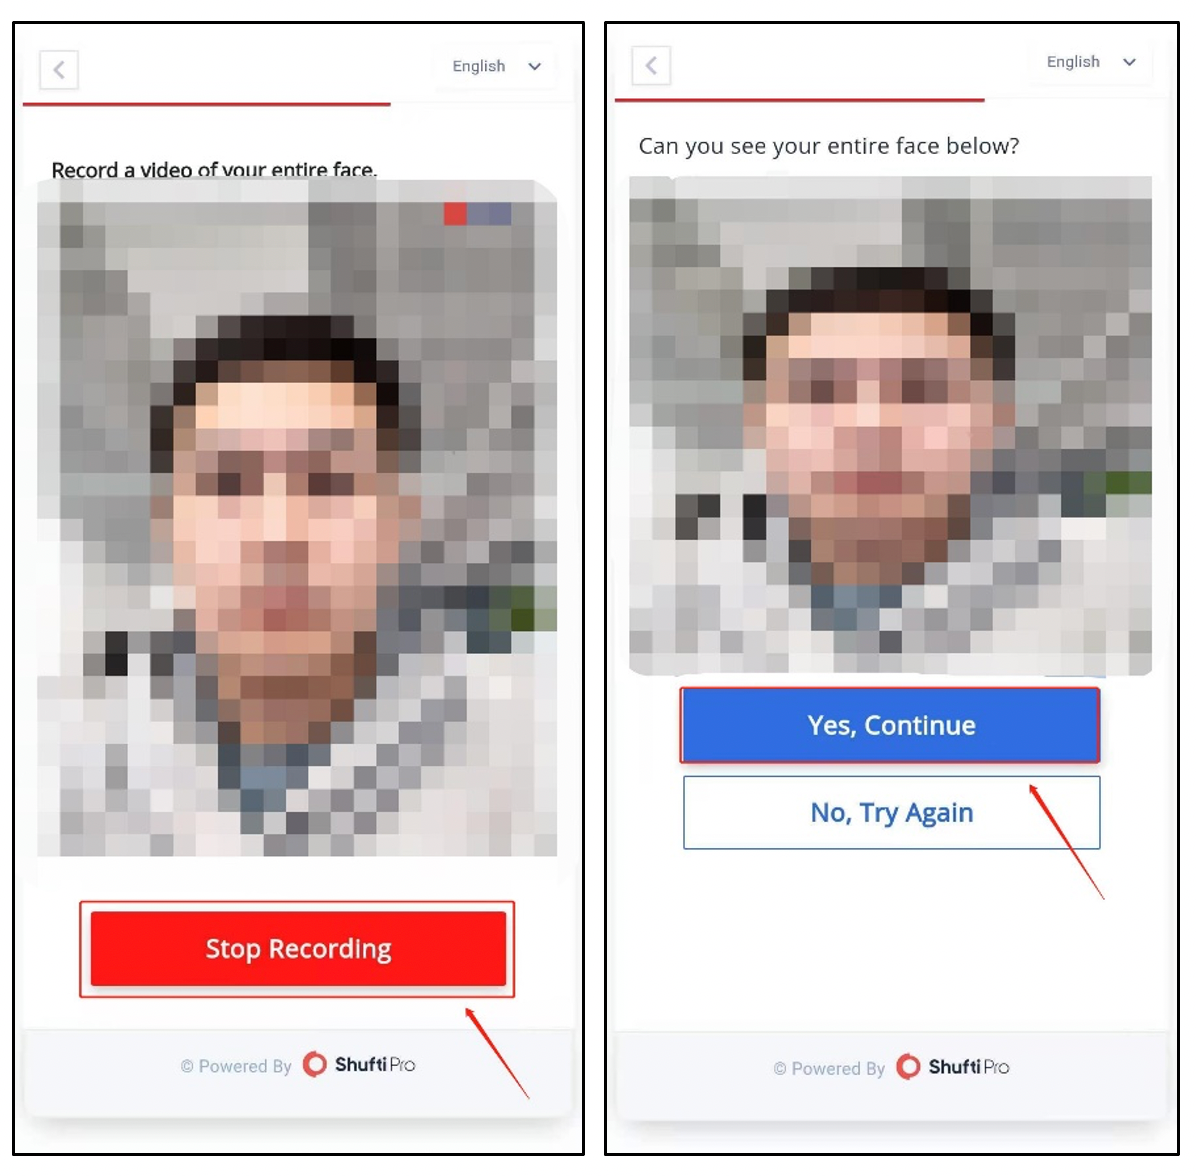
Click “Stop Recording” to complete the shooting, check whether the face in the random screenshot is clear, and click “Yes, Continue” to upload the video. Users can also choose to shoot the video first, and then select to upload the video. After the upload is successful, please wait patiently for the review and verification. If “Success” appears, then the authentication is successful.
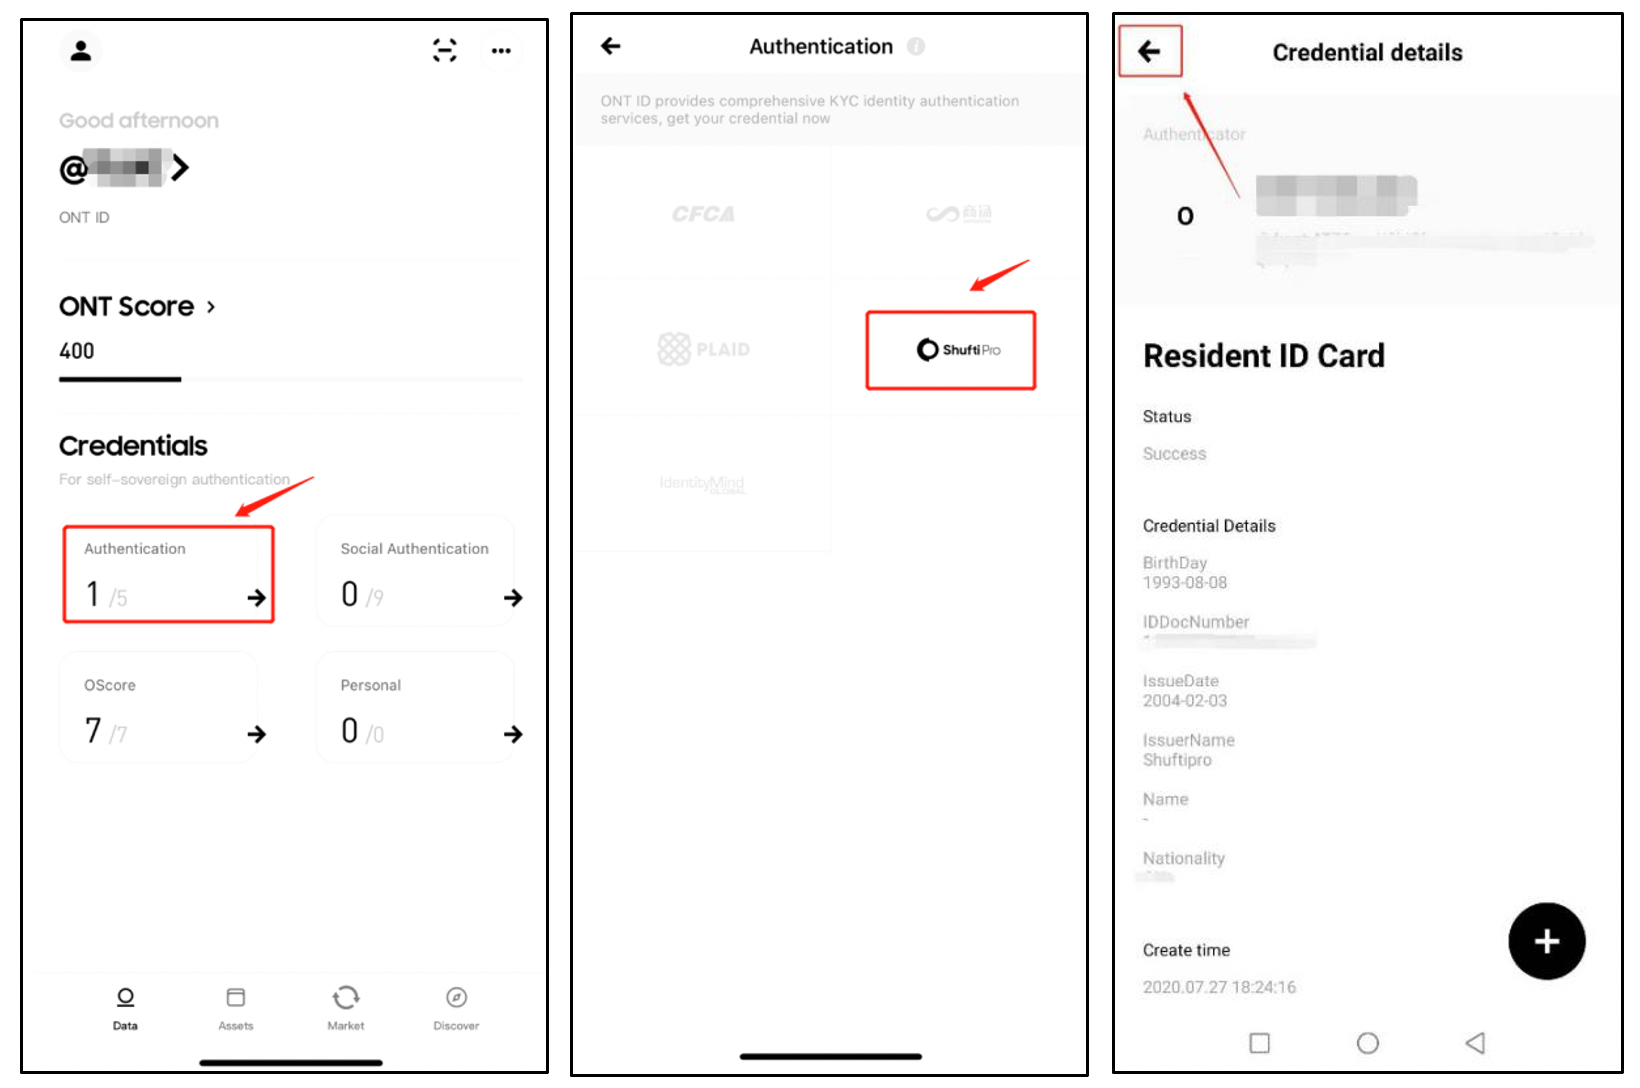
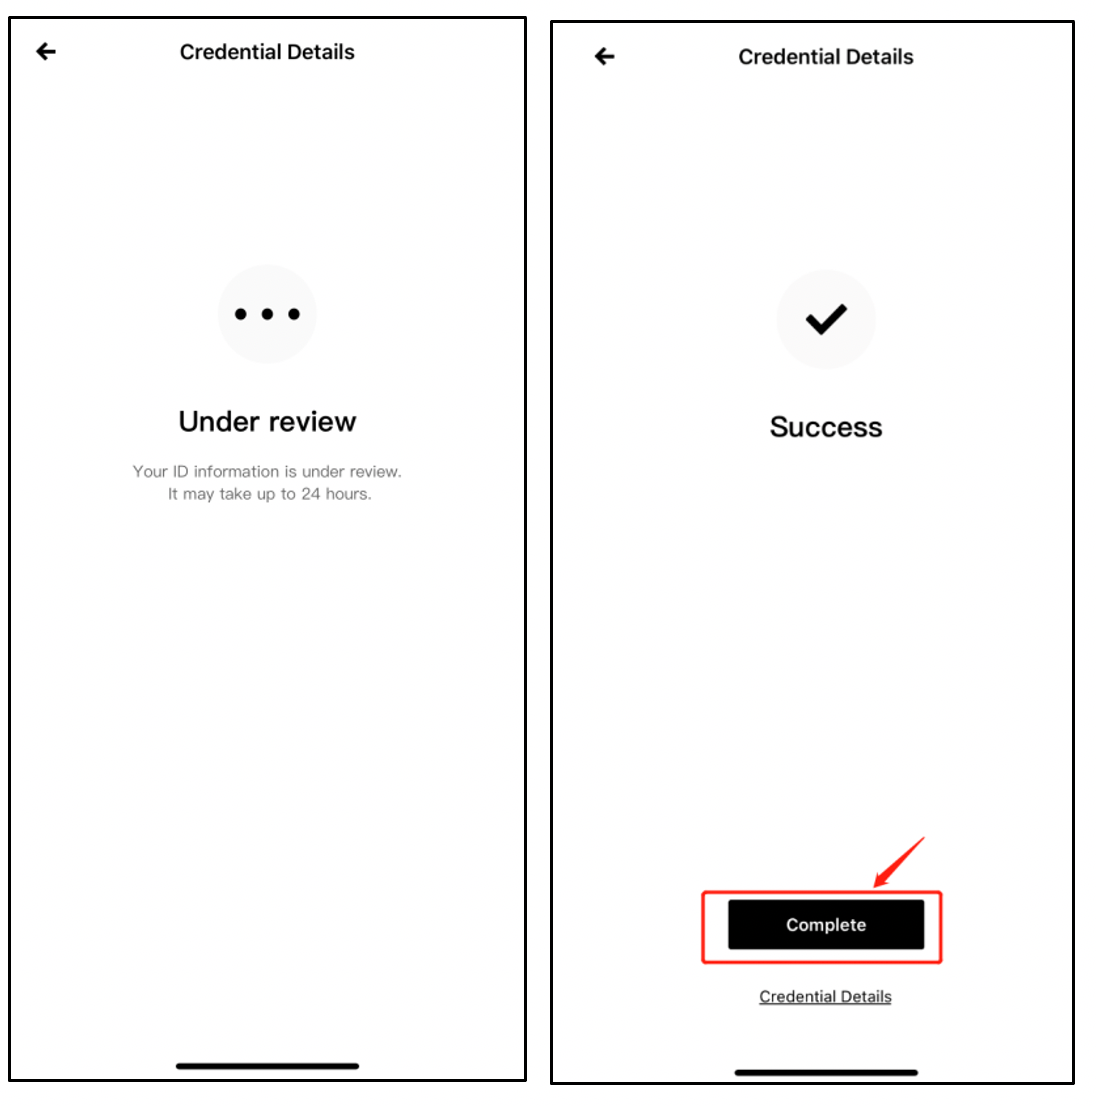
Please continue to return to the Data home page, select “Authentication” to enter, select Shufti Pro to view the identity authentication certificate, and then the identity authentication process is completed.
**Step 2: Obtain access to start borrowing in Wing’s Inclusive Pool**
After the OScore generation and KYC authentication are completed, users can get access to the borrowing of Wing’s Inclusive Pool.
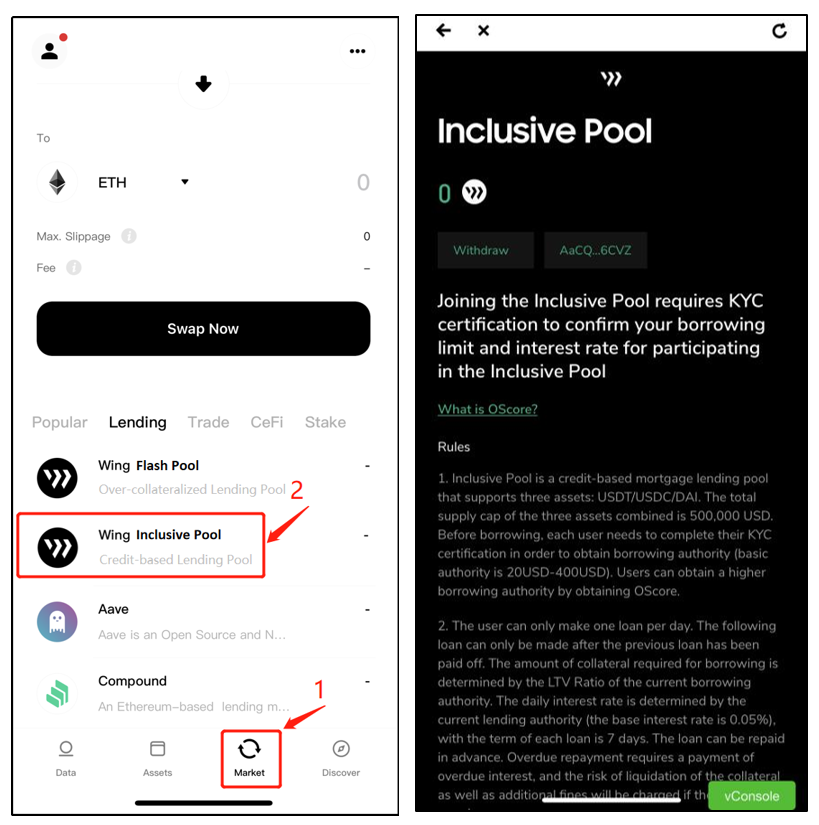
Open ONTO, click “Market” in the bottom sidebar to enter the market page, and click “Wing Inclusive Pool” to enter

Click the “Identify” button on the Inclusive Pool page. After entering the page, click the “please bind your ONT ID” button.
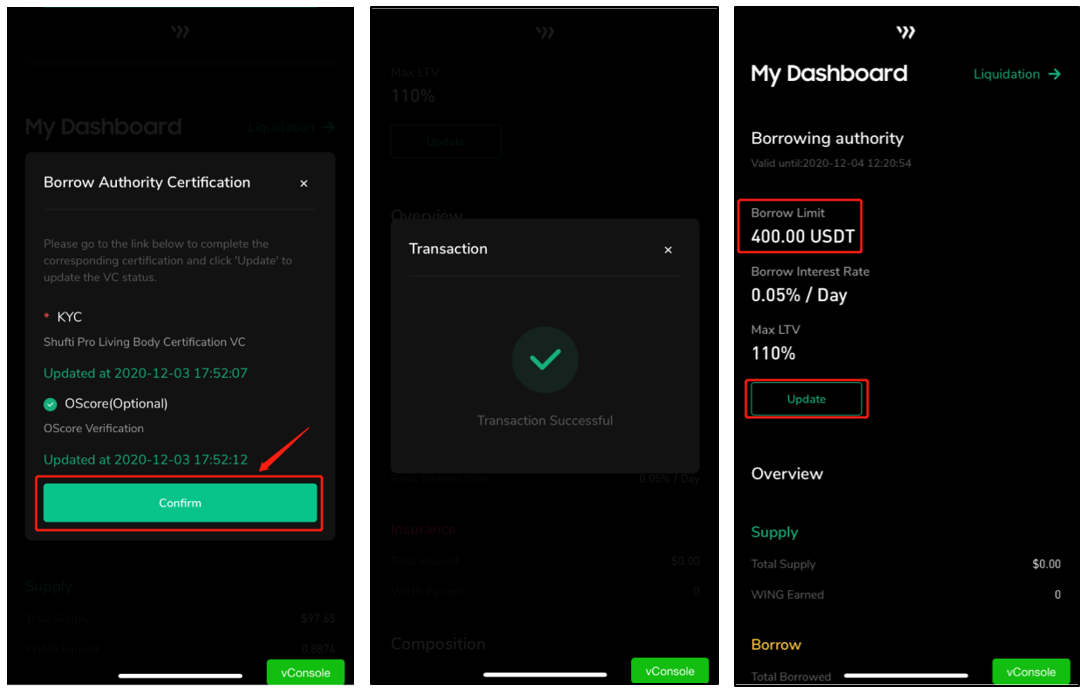
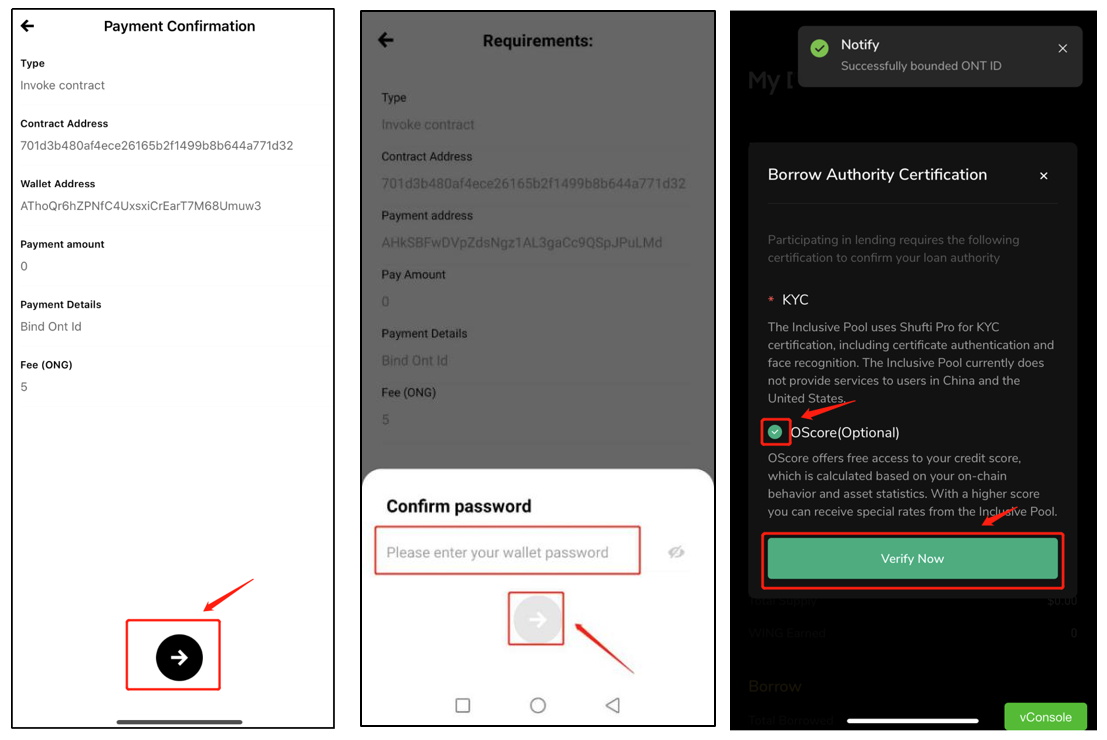
After confirming the information, click the arrow below, enter the wallet password, and then click the arrow again to confirm. KYC authentication must be selected and OScore is option-able. Then click the “Verify Now” button, and “Confirm” button. When “Transfer Successful” appears, the ONT ID is bound successfully. Then you can see the information related to borrowing authority under “My Dashboard”, and the button is updated to “Update”. At the same time, the “Borrow Limit”, that is, the maximum amount of assets you can borrow is also updated.
*The validity period of the borrowing authority is 24 hours. If the current borrowing is more than 24 hours away from the last update, please click the “Update” button again to update and then operate the borrowing again.*
**Step 3: Borrowing**
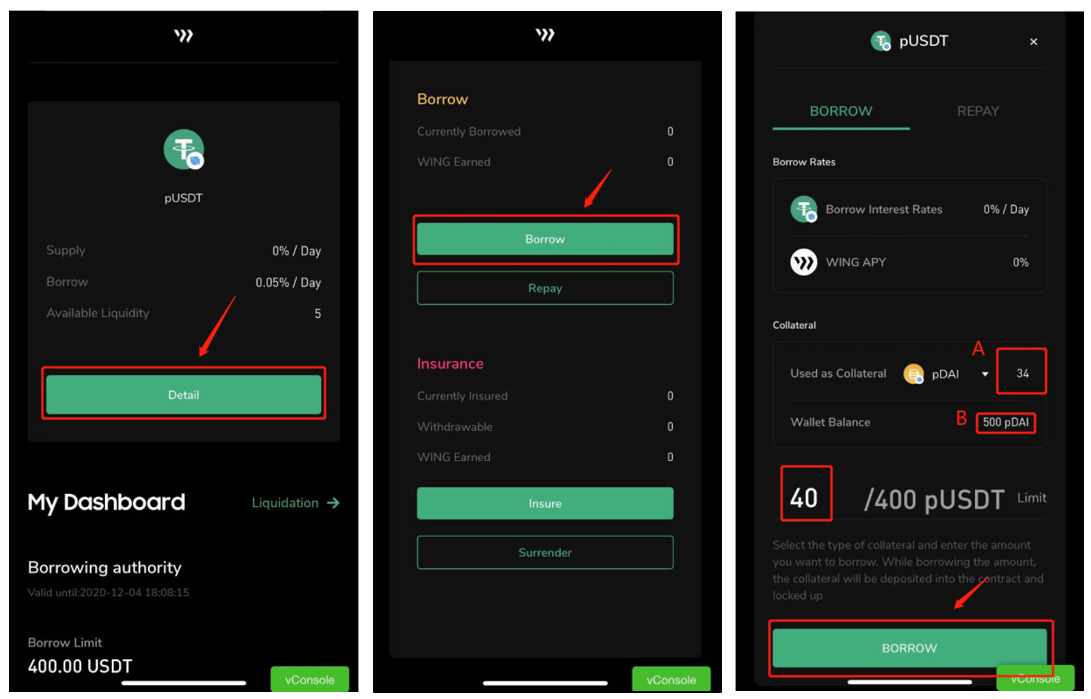
You can participate in borrowing after you are granted access. Take borrowing pUSDT as an example, click the “Detail” button under pUSDT, enter the detailed page of pUSDT, click the “Borrow” button, and select the asset type for collateral under the “Collateral” column. The type of asset used as collateral cannot be the same as the asset type of the loan. Please ensure that the number of collateral assets in the wallet is sufficient. Here we will use pDAI as collateral. In the input box below, enter the amount to be borrowed. *The amount of assets to be borrowed cannot exceed the maximum amount of assets that can be borrowed*. The required amount of collateral assets will be automatically calculated according to the desired amount to be borrowed. If the value of “Used as Collateral” is A, and “Wallet Balance” is “B”, it is necessary to adjust the amount of assets to be borrowed so that A ≤ B. Click the “borrow” button. After confirming the information, click the arrow below. After inputting the wallet password, click the arrow below again to confirm. After completion, the borrowing is successful.
After the borrowing is successful, you can see the number of assets that have just been borrowed in the “Borrow” area under “Your Position”. You can view the Wing incentive of this borrowing under the “Wing Earned” column.
*When the borrower repays before the due date, the wing incentive will be withdrawn to the address along with the repayment. If the repayment is overdue, the wing incentive will be cleared.*
### 3.2 Repayment of borrowed assets
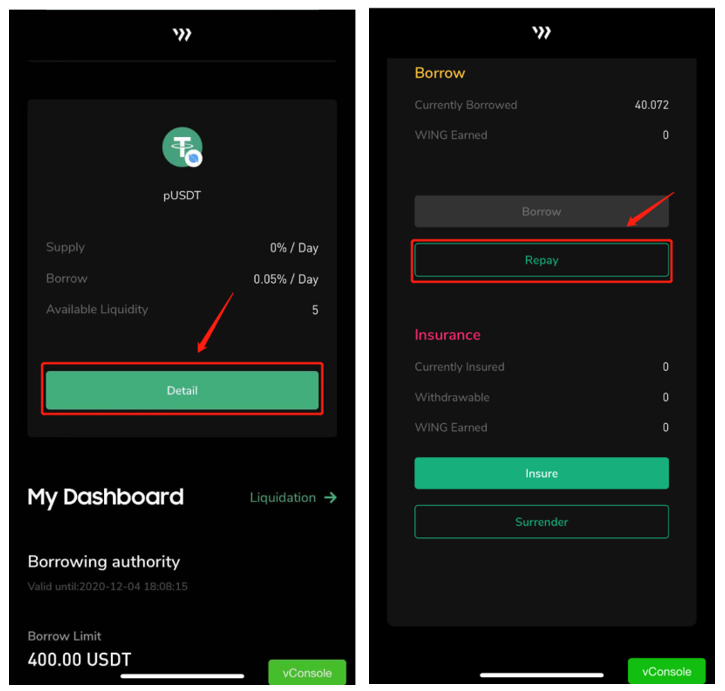
Here, take the repayment of pUSDT as an example. Click the “Detail” button under the pUSDT to enter the detailed page of pUSDT, click the “Borrow” area under “Your Position”, and click the “Repay” button.

Input the number of assets to be repaid in the input box of the pop-up window, or click the “FULL” button to pay off the principal and interest, before clicking the “REPAY” button. After confirming the information, click the arrow below. After inputting the wallet password, click the arrow below again to confirm, then the repayment is successful. If repayment is done before the end of the due date, the amount of collateral and Wing incentive will be synchronously transferred to the balance of the wallet. If repayment is done before the end of the grace period, then the amount of collateral will be synchronously transferred to the balance of the wallet.
*The interest of the Inclusive Pool is calculated by day (UTC time) without compound interest. Partial repayment will be paid for interest first, and the interest is calculated according to the remaining principal after partial repayment.*
## 4. Supplying in the Inclusive Pool
Supply means lending assets. By doing so, users can obtain interest and Wing incentives of the lent asset. The asset type of interest obtained is the same as the lent asset. The obtained WING incentive is WING. The annualized rate of return is displayed as APY and WING APY respectively. Each operation requires ONG to be paid as a transaction fee.
In the event of liquidation, the lender will also suffer a certain proportion of losses, which may lead to the loss of the lent assets. Please decide whether to join the lending pool after fully understanding the risks and being prepared to take risks.
### 4.1 Lending assets
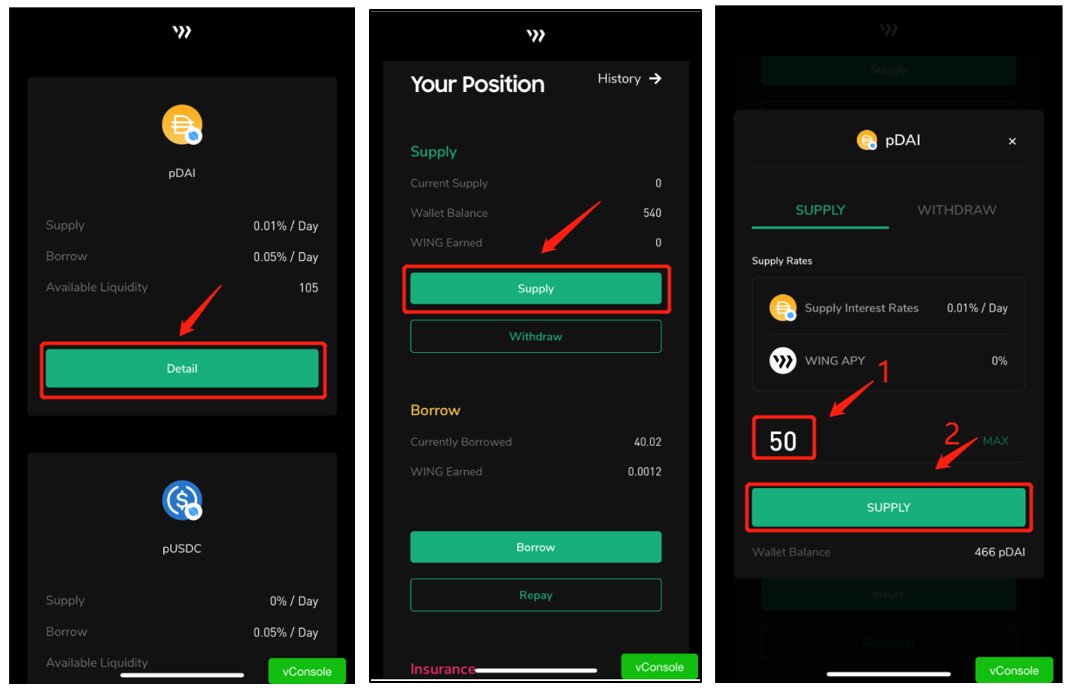
Select the asset type to be lent. Take pDAI as an example, click the “Detail” button below the pDAI to enter the asset detailed page of pDAI, and click the “Supply” button” under “Your Position” in the “Supply” area. Input the amount of assets to be lent in the pop-up window, or click the “Max” button to lend all, and click the “Supply” button. After confirming the information, click the arrow below, enter the wallet password, and then click the arrow head below again to confirm. After completion, the loan is successful.
*The upper limit of the total number of lendable assets (the sum of the number of pDAI*,*pUSDT*,*and pUSDC) participating in the inclusive pool is 500,000, that is after the number of lendable assets reaches 500,000, users cannot lend again.*
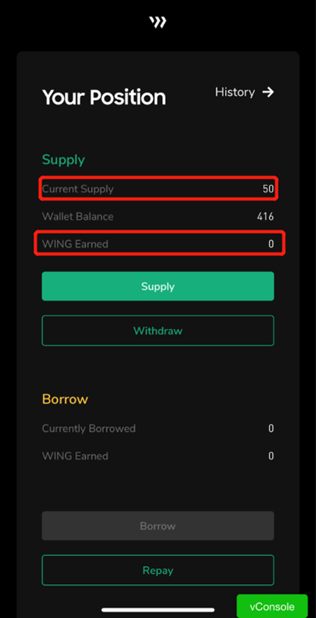
After the lending is successful, you can see that there is the pDAI just lent out in the “Supply” area under “Your Position”. You can view the wing incentive obtained from this lending under the “Wing Earned” column.
### 4.2 Withdrawal of lent assets
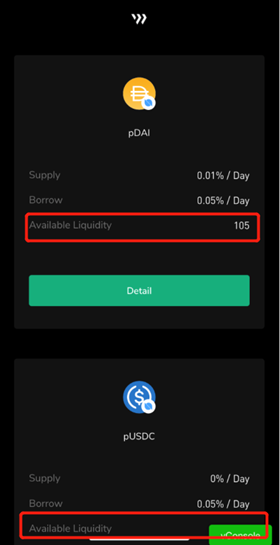
Before withdrawal, please check the “Available Liquidity” of the assets to be withdrawn, and confirm the maximum number of assets that can be withdrawn for the type of asset to be withdrawn before starting the withdrawal.
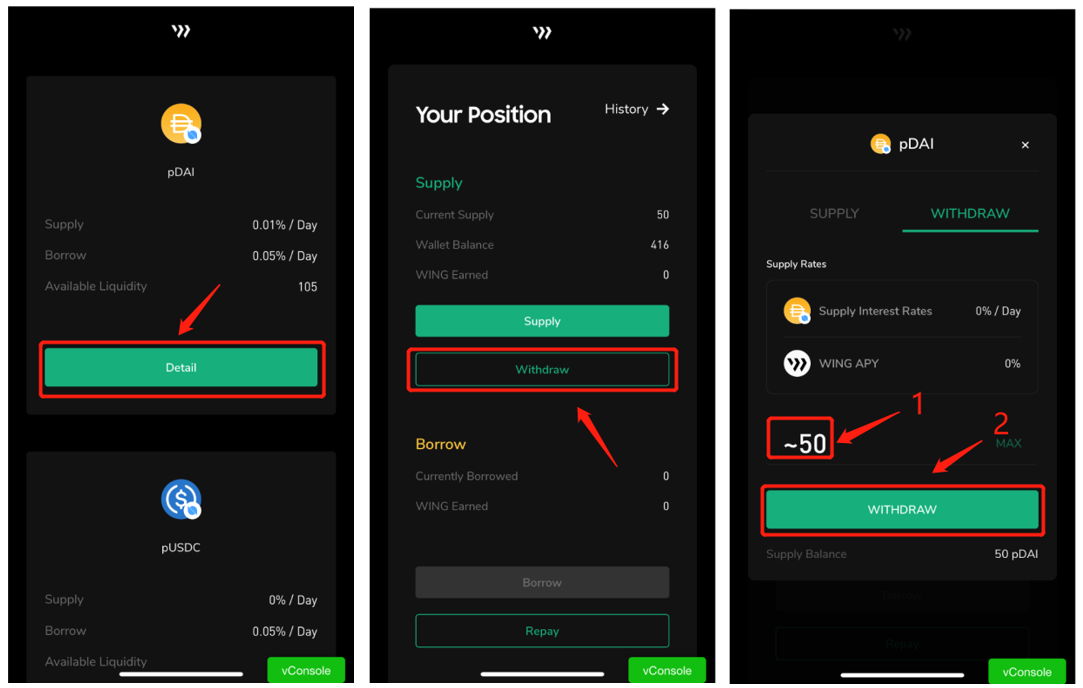
Take pDAI assets as an example, click the “Detail” button below the pDAI to enter the asset detailed page of pDAI, click the “Withdraw” button in the “Supply” area under “Your Position”, input the number of assets to be withdrawn in the pop-up window input box, or click the “Max” button to withdraw the principal and interest completely, and click the “WITHDRAW” button. After confirming the information, click the arrow below. After inputting the password of the wallet, click the arrow below again to confirm. After completion, the withdrawal is successful.
## 5. Insuring in the Inclusive Pool
In addition to participating in borrowing and supplying, you can also obtain WING incentives by insuring WING.
In the event of liquidation, the insured party will pay a certain proportion of the losses to the lender, which will lead to the loss of the insured assets; each insured asset will be locked for 72 hours, and the insurance can be withdrawn after 72 hours. Please decide whether to join the pool after fully understanding the risks and being prepared to take risks.
### 5.1 Insuring Wing
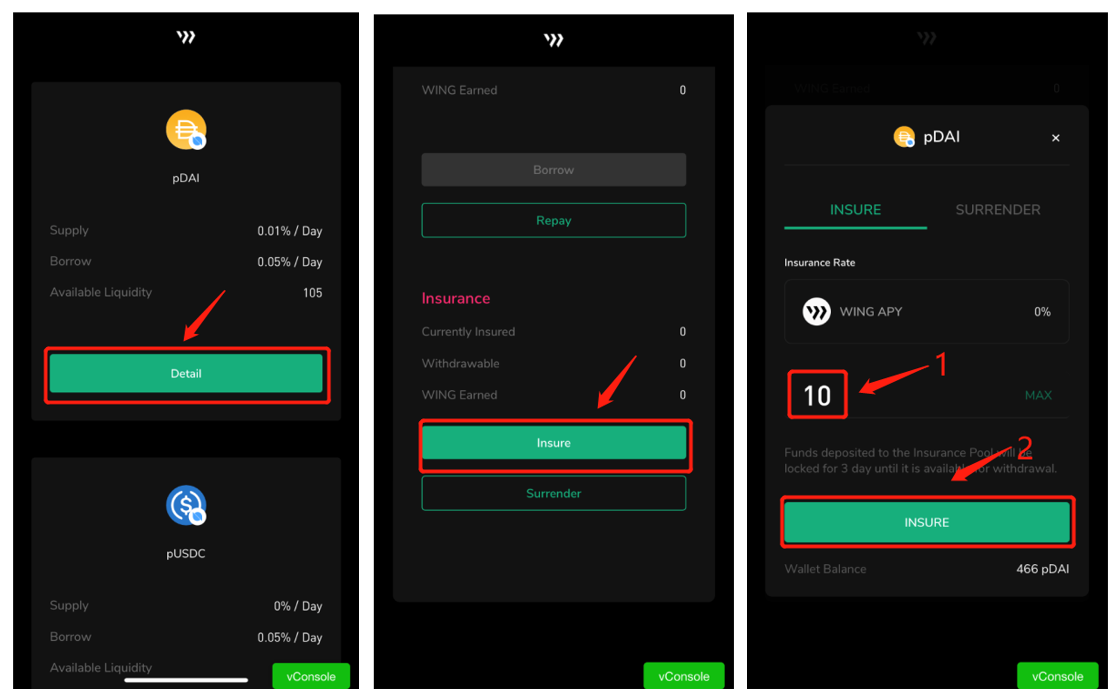
Select the type of assets to be insured. Take pDAI as an example, click the “Detail” button below the pDAI to enter the asset detailed page of pDAI, click the “Insure” button in the “Insurance” area under “Your Position”, input the amount of assets to be insured in the pop-up window, or click the “Max” button to lend all.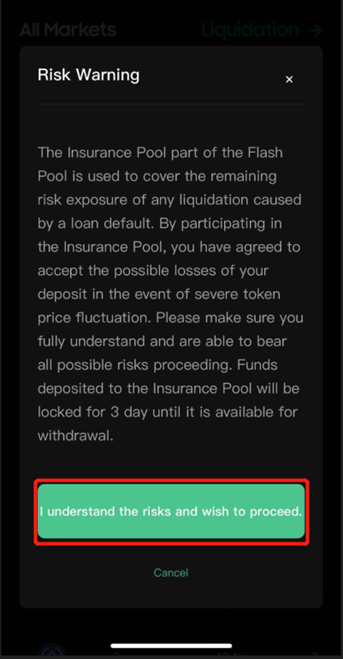
Click the “Insure” button to view the risk warnings on the “Risk Warning” page. After understanding the warnings, click the “I understand the risks and wish to proceed” button to confirm (required for the first time of insurance). After confirming the information, click the arrow below, enter the wallet password, and then click the arrow below again to confirm. After completion, the insurance is successful.
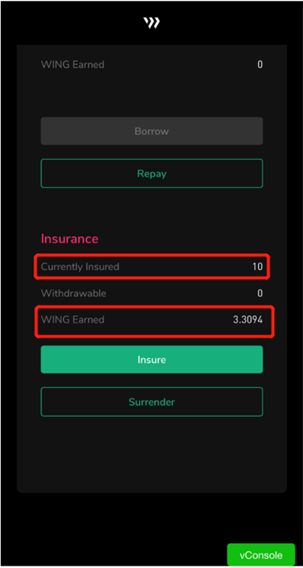
After completion, you can see that there is pDAI just insured in the “Insurance” area under “Your Position”. Under the “WING Earned” column, you can view the wing incentives obtained from this insurance.
### 5.2 Surrendering WING
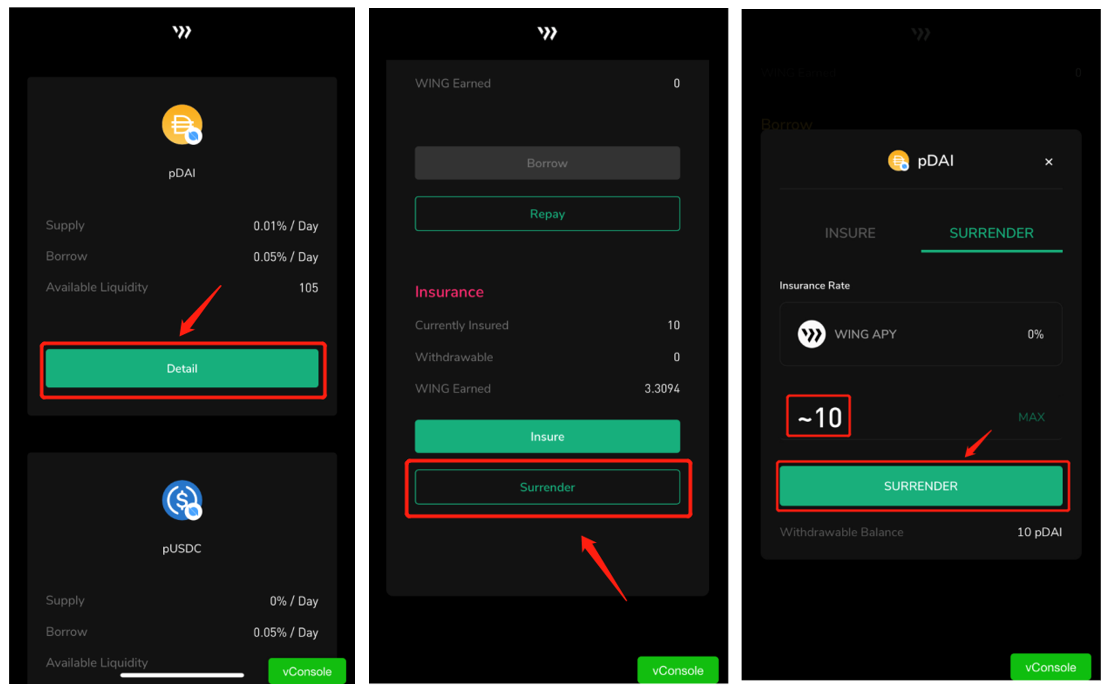
Take pDAI assets as an example, click “Surrender” in the “Insurance” area under “Your Position”, input the number of assets to be withdrawn in the input box of the pop-up window, or click the “Max” button to surrender all assets, and click the “SURRENDER” button. After confirming the information, click the arrow below, enter the wallet passcode, and then click the arrow again to confirm. After completion, the surrender is successful.
## 6. Withdraw Wing tokens obtained through incentives
Participating in the borrowing, supplying, and insuring of the Inclusive Pool can get you WING incentives. Each time the lending and withdrawal operation is carried out, the previously obtained Wing incentives for participating in supplying will be automatically withdrawn to the address; each time insurance and surrender operation is conducted, the previously obtained wing incentives for participating in insurance will be automatically withdrawn to the address; each time the loan is paid off before the end of the repayment date, the previously obtained wing incentive for participating in borrowing will be automatically withdrawn to the address. This step is usually not required.
The steps of taking the initiative to withdraw WING (only WING incentives obtained by participating in supplying and insuring can be withdrawn) are as follows:
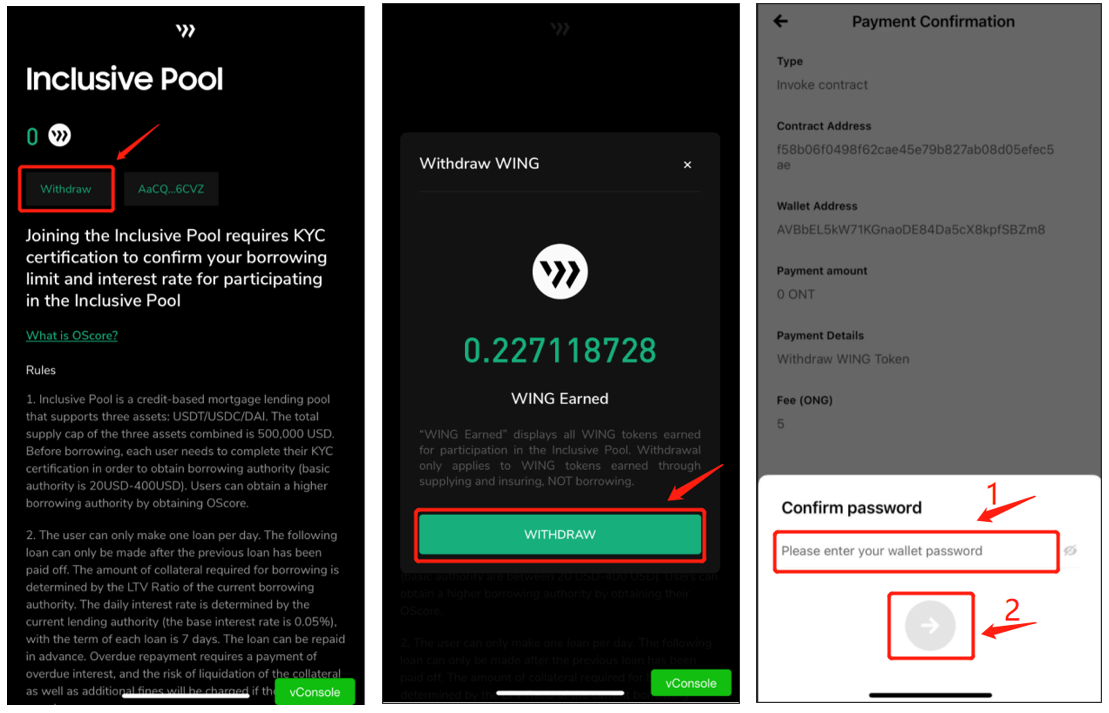
On the left side of the WING icon in the upper left corner of the Inclusive Pool page, the total number of WING incentives is displayed. Click the “Withdraw” button. After confirming the information, click the arrow below. After inputting the wallet password, click the arrow below again to confirm. After completion, the withdrawal is successful.
*The WING displayed above the “Withdraw” button and in the pop-up page after clicking the “Withdraw” button is the total number of WING obtained by borrowing, supplying, and insuring, but the actual amount withdrawn to the account is WING incentives obtained by lending and insuring, and WING incentives obtained by borrowing will be withdrawn to the address when users pay off the loan.*